
Photography has taught me a lot, and for that, I am forever grateful, however, at the same time, it has brought to my attention a lot of things that I did not know before.
For instance, the whole concept of the inverse-square law of light was something that was previously unknown to me and, therefore, never really occurred.
However, after doing some research, I realized just how important it is not just outside photography but in it, as well. That is why in this article, we are going to explore this law and see what it is all about.
How Light Works The Inverse Square Law
The first thing that we are going to do is look at just how light works in the inverse square law. This is, of course, very important to fully understand the law in the first place.
For starters, if you double the distance between the subject and the light source, it will illuminate a surface area four times greater than the one before.
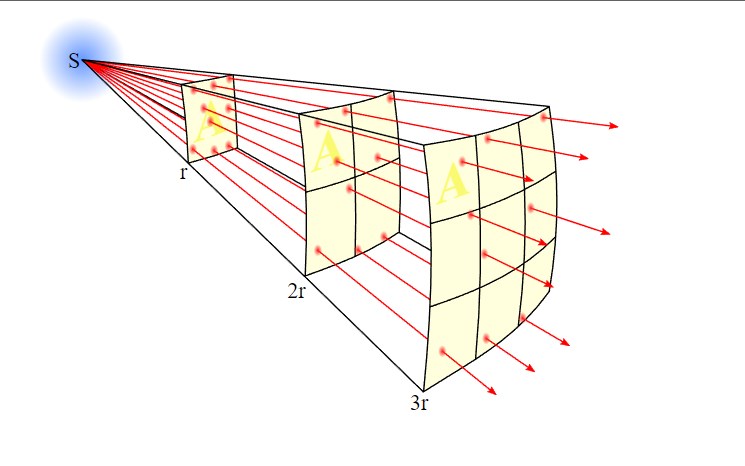
In general, we normally multiply the distance with itself so we can calculate the enlargement of the surface area. However, in cases of a larger surface area, the light intensity becomes inversely proportional to the square of the distance since the same amount of light needs to be distributed onto a larger surface area.
That is the reason we see light fall-off, which also means a decrease in light intensity. In technical terms, the inverse-square law of light reads as follows.
The energy (in this case: light intensity) at location A (subject area) decreases inversely proportional to the square of A’s distance to the energy source (for example, the flash head).
While it might sound and look complicated, it only requires some basic knowledge to actually get it right and write things down.
More readings:
- What is hdr photography? And how to use it?
- What is focus breathing (everything you need to know)
- What is split color lighting? (best tips and tricks)
- What is a crop factor? And how does it affect it?
- What is lens compression? (breaking everything)
How To Use The Inverse Square Law In Photography?
Now that you know what the inverse-square law of light is, the next logical step would be to start talking about just how you can go ahead and use this in photography.
I can already tell you that I know so many photographers who have not even heard about this law to begin with. However, that does not change the fact that it is useful and works wonderfully.
With that said, the formula is a lot simpler than one might think. All you need to do is take the distance from the light to the subject and then inverse the square of it. Confused? Let me make it easier for you.
If the distance is one foot, the inverse of one squared comes down to just one. In other words, the light you are going to get is 100-percent without any adjustment.
When you increase the distance to two feet, you get the inverse of two squared, which is ¼, which mean means you are only going to get 25% of light. When the distance is three feet, you are going to get 1/9, which means that only 11% of light is present.
So, as a photographer, you will have to make use of the formula and then figure out the light, but thankfully, once you get good at it, you can do most of it on the fly.
Using The Inverse Square Law For Natural Light Portraits
Not many people know this, but you can use the inverse-square law of light for some stunning natural-light portraits, as well. Now, I am not going to tell you to remember some law that is going to be honestly difficult for a lot of people, but hey, it is just something that you will have to do, to be honest.
You can start by getting a garage light which usually serves amazingly for photos that are going to have a black background. You want to go ahead and place your subject in the shade but close to the line from the sun.
So, be sure that you look for that line on your garage floor, where the light and the shadow meet. Place your subject there, and you will be all good to go.
By doing so, you will get access to some really nice light on their face, but the light falls off rather quickly and becomes very dark behind your subject. The point here is knowing how to go ahead and use the law so you can get the type of pictures you want with great ease.
What Is The Inverse Square Law In Simple Terms?
I believe we have talked about everything that needed to be talked about, so the next thing is that we are going to start looking at just what exactly is inverse-square law. To be honest, it is not at all complicated.
The law is that the light intensity decreases with the distance from the source to receiving surface, and the rate of this decrease is in proportion to the square of the distance between the emitter and the receiver. This is called the inverse-square law, and this is perhaps the easiest way to understand the difference.
Wrap-Up:
If you are just getting into photography, understanding the inverse-square law of light can be a difficult thing. But I have to be honest with you; it really is not something that you should be fretting about. If you know the law and how it works, you will have a much easier time using it than actually studying it.
Most of the things that this law covers are already a part of a photographer’s routine, and using these techniques happens on almost a daily basis. Therefore, it is better that you are keeping it in mind before you go ahead.
Sources: