
In photography, the term exposure compensation is something that you will be seeing used time and time again, and there is nothing too complicated about this term, either. It is one of the most important aspects of photography, therefore, it is better that you are paying good attention to it.
Now, the question for most people is just what is exposure compensation, and honestly, the answer is not that difficult, to be honest.
Still, I understand that getting into photography is a process that requires one person to learn about a lot of aspects related to photography, and therefore, it is wiser that you are well prepared.
In this guide, we want to discuss exposure compensation, what it is, how it works, how to use it, and its advantages. If you are looking to get started, this is the right place, and you will find all the information here.
What Is Exposure Compensation?
Exposure compensation is a very simple technique that allows the photographers to forego the exposure settings that the camera’s light meter detects. This is done to either brighten the images or darken them before they are capture.
Considering how your camera’s light meter is going to evaluate the light reflected off subjects, use middle grey or 18% grey as a standard, any time the camera is pointed at something darker, the meter will work the opposite way and brighten the subject.
I understand that his might is not the ideal situation for a lot of people, but by using exposure compensation, you can get out of a trickier situation where you are looking for a brighter or a darker image.
It is not at all difficult to understand but does take some time to understand. You can play around with it in various light situations, and then you will get a proper gist of it.
How Exposure Compensation Works
Now, this is a bit trickier as compared to just understanding exposure compensation because here, you are looking at a few technicalities that go into making this thing work.
Exposure compensation works by adjusting either one or more exposure variables; this depends on the camera mode that is being used.
For instance, if you are using aperture priority mode, the photographer will have to set the camera’s aperture, while a camera takes care of the shutter speed depending on whatever the reading from the camera’s meter is.
When adjusting exposure through the exposure compensation, the photographer simply overrides the shutter speed that is set by the camera.
This means that if you dial -1 EV through the exposure compensation, it will increase the shutter speed in aperture priority mode, and if you are dialing a higher value than negative, it will decrease the value.
However, if you shift to the shutter priority mode, the exposure compensation feature is going to impact the camera’s aperture instead of shutter speed. This means that dialing a positive or a negative value in shutter priority mode will result in an increased or decreased shutter.
How To Use Exposure Compensation?
If you want to use exposure compensation at all, you will only be able to do if you happen to be in one of the camera modes that is going to support the camera meter.
This means that you will either need to be in aperture or shutter priority, program mode, or any other scene mode that uses automatic exposure adjustments.
You can even use this in manual mode, but you will have to turn off the auto ISO. With that said, once you have selected the proper camera mode, you will be able to adjust the brightness of the image by using the exposure compensation feature of the camera.
Sadly, finding the exposure compensation option is going to vary from camera to camera. While some cameras have a button on them, some cameras have a button on the touch screen. The button is essentially a +/- button that is coloured black and white.
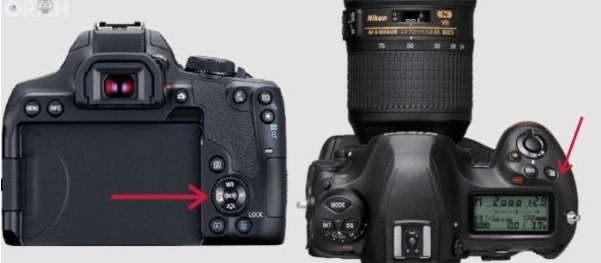
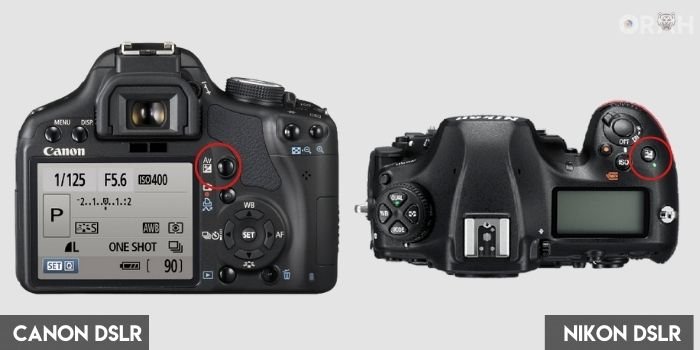
The values normally go from -3 to +3 with smaller increments in between. For Nikon cameras, most of them have a button on the top. As for the Canon cameras, you can find them on the back.
Mirrorless cameras often ship with dials that will allow you to make these changes. You can alternatively consult your camera’s manual to find out the right place.
When To Use Exposure Compensation?
This is somewhat tricky because it all depends on the camera’s meter that is reading the light. There are several situations we call common situations in which the camera’s meter is not going to be able to assess the brightness of the situation properly. Especially when the scene is either predominantly black or white.
If you are trying to photograph someone who is standing indoors in front of a window, the daylight in the distance could turn that person into a silhouette. Exposure compensation can help you ensure that the exposure of the face is correct.
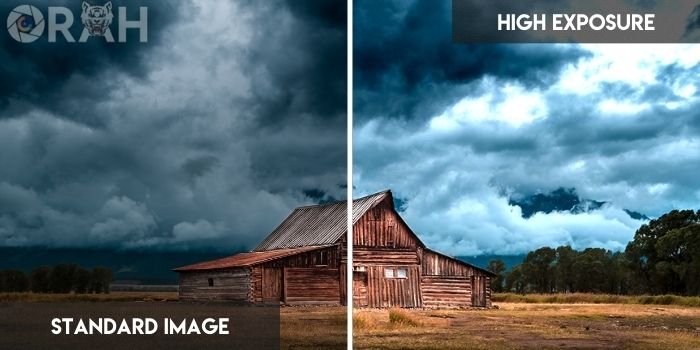
In addition to that, shooting scenes that are either too bright or too dark can be helped greatly with the proper exposure compensation can help you a lot.
I understand that it is not something that is going to be as straightforward for a lot of people, but the more you use this feature, the easier it will eventually become for everyone interested in getting started.
Don’t worry if you are having difficulties at the start. We have all been there, but you end up mastering the technique the more you use it.
Exposure Compensation And Different Camera Modes
Now that we have gotten this far, there is some more information about exposure compensation and how these things are handled. You have to understand that when we are discussing exposure compensation, several factors are involved in this process.
First things first, not every camera is going to have a similar exposure compensation dial or placement. Other than that, exposure compensation is something that only works in select camera modes and select conditions, as well.
For starters, you can use exposure compensation with ease in program mode. You can also use it without any issue in modes such a shutter priority or aperture priority. It can also be used in some scene modes.
Lastly, exposure compensation can also be used in manual mode, but you have to be sure that the auto ISO. Any mode other than that, and there are high chances that you will not be able to use exposure compensation at all, and therefore, it is better to be aware of this in advance, so you are well prepared.
Where Can You Find Exposure Compensation?
Although I have covered this before, it does not hurt to go over it in a separate section which is about finding the exposure compensation as it is always different for different cameras. Some cameras, instead of having a button for it, ship with a dial that lets you control it on the fly.
While other cameras come with buttons that you can press. To make things easier for you, we have listed down a few common locations where you can find exposure compensation.
- Nikon: Most of the Nikon cameras you see will have the exposure compensation button on the top.
- Canon: For Canon cameras, you can find the exposure compensation button on the back.
- Most Mirrorless Systems: In addition to that, most mirrorless systems that you see in the market ship with exposure compensation dials on the top of the camera for easy switching.
Exposure Bracketing
Once you have understood what exposure compensation is, I would like to address your attention towards another technique that is used in tandem, and it is called exposure bracketing. It is one of the simplest but useful techniques that allows you to take great photos all the time.
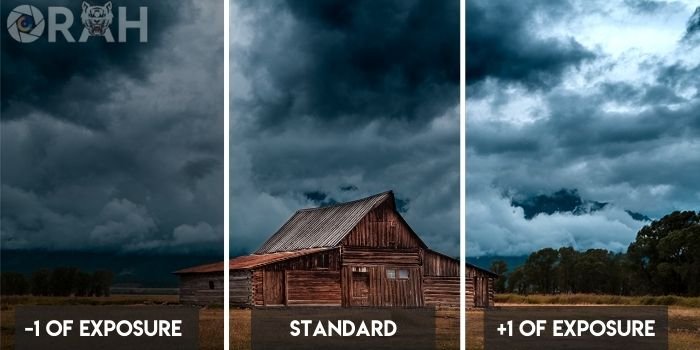
In this technique, instead of taking a single photo, the camera takes three or more than three. Where all the photos are differently exposed. This means that one is underexposed, one is correctly exposed, and the other is overexposed.
Once you are done, you can choose the photo that is correctly exposed, and that will be the end of it. You can just get started with the process right away, and look for this feature in your camera because that is going to help you a lot, as well.
Just be sure that you are using the right modes for your photography because that is always important.
What Is Exposure In Photography? How We Record Light?
Exposure has different meanings in different aspects, but when you are talking about photography, exposure becomes the feature that lets you control the amount of light that can reach the camera sensor to take the picture or the video you want to shoot.
With that said, exposure is comprised of three components starting from exposure itself, which serves as the act of increasing or decreasing the light that hits the sensor, ISO, which also works towards brightening or darkening the picture but can have noise in the photos if you exceed a certain level.
Next, you have the shutter speed, which essentially is just how fast or slow your shutter opens and closes. All these components have to be used in tandem to get the perfect picture every single time, or else you will not be able to achieve that in the first place. As far as recording or measuring light, that can be done in two ways.
The first one is using handheld light meters that are more accurate than some of the other options, and then you have the built-in camera measurement system that is also called TTL or through the lens metering system that uses the light passing through the lens to determine what the light is and how it is measured.
Advantages & Drawbacks Of Using It
It is important to understand that when you are talking about exposure compensation, several benefits come with it, but at the same time, there are several disadvantages, too. That is why I am going to list down the benefits first, so you know what you are getting into.
- Allows you to control the light the easier way.
- Deals with harsh lighting conditions.
- Allows you to make on the fly adjustments.
- Easy to use.
However, at the same time, several disadvantages follow suit, so you can look at them below.
- Sometimes, exposure compensation is not enough in different modes due to how it behaves.
- Certain incremental changes are often difficult to achieve with exposure compensation.
- The process takes time to learn and master for beginners, and most people give up on it and go for auto mode.
Frequently Asked Questions (FAQs)
Q1- Is exposure compensation the same as ISO?
Answer: A lot of the times, people compare exposure compensation with ISO, and while both things can influence the image by making them darker or brighter, they are inherently different and are used together to make the perfect image. This means that exposure compensation is never the same as ISO.
Q2- What is Exposure Compensation Canon?
Answer: Exposure compensation works the same way on every camera by every maker, but the functionality is located differently. For instance, Canon cameras, at least most of them, have their exposure compensation button on the backside, which allows for easier access. The button is marked AV, so you will have an easier time finding it.
Q3- What should I set my exposure compensation to?
Answer: As far as setting the exposure is concerned, all cameras have the same way of setting. The setting normally has three variances on the positive side and three on the negative side with smaller increments in between. As far as your exposure compensation is concerned, you should set it according to the scene you are shooting in.
Q4- Does Exposure Compensation add noise?
Answer: There is a common misconception that increasing or decreasing the exposure compensation ends up creating more noise, but that is not the case. That happens when you increase the ISO above a certain level. Most modern cameras can handle ISO up to 6,400, but beyond that, there is digital noise that creeps in the photos.
Q5- Does Exposure Compensation affect image quality?
Answer: No, if you are wondering whether exposure compensation is going to make your images look different, that is not the case. However, exposure compensation can brighten or darken your image, and things might look strange if you are not setting it properly. Therefore, proper use of this technique is what we would advise everyone.
Wrap-Up:
Taking great photos is not something that people are born with. Granted, you might have a great eye from the beginning, but the learning process is more or less the same for everyone. Photography is not something that is set in stone. This means that it is not the same for everyone.
Everyone is going to use the camera differently, develop a style differently, and have proper control of the camera the way they want to. You just have to be aware of the basics, so nothing else goes wrong, and with this article, that was the purpose.