There’s a certain kind of photo that sits in your camera roll forever: a great snapshot with real energy, but no obvious place to post it. I ran into this after a friend’s birthday—one perfectly timed group photo, everyone mid-laugh, but it didn’t quite fit as a “memory dump” post. I wanted something lighter. Something that felt like the moment again.
That’s where photo dance comes in.
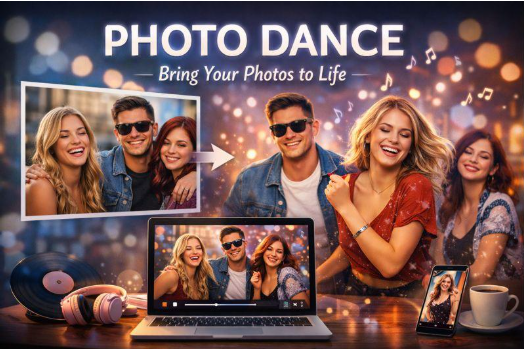
A photo dance video takes a single image and adds motion—subtle head turns, a bounce, a sway, a beat—so the picture feels alive without turning into a full-blown production. Done well, it’s not “look what AI can do.” It’s “this is us,” but moving.
Below is a practical, creator-friendly way to think about photo dance: when it works, how to keep it tasteful, and how to get share-ready results without spending your entire evening tweaking settings.
Contents
- What “photo dance” really is (and why it’s trending)
- What It Can Do — and What It Can’t
- A simple workflow to get clean results
- Quick comparison table: options and trade-offs
- Consent, privacy, and avoiding the “uncanny” zone
- Bonus: combining dance with face-focused effects
1) What “photo dance” really is (and why it’s trending)
A photo dance video is basically a short clip (often 3–10 seconds) created from a still image. The motion usually focuses on the upper body and head, with rhythm synced to a dance template or beat. The appeal is obvious:
- It’s fast to make (no filming, no lighting setup, no reshoots)
- It’s easy to personalize (one photo can become five different vibes)
- It plays well on social (short, loopable, instantly readable)
Most importantly: it lowers the bar for “making something.” Instead of waiting until you have time to shoot, you can start with the photo you already like.
2) When it works best (and when it doesn’t)
Photo dance looks best when your input photo has:
- A clear, front-facing subject (or subjects)
- Good lighting and visible facial features
- Minimal motion blur
- Simple backgrounds (or backgrounds that don’t matter)
It tends to struggle when:
- Faces are tiny (crowd shots from far away)
- The photo is heavily filtered or low-res
- Hair/hand details overlap the face
- The subject is turned fully sideways
If you’re trying this for the first time, pick the “boring” photo first: sharp, well-lit, centered. You’ll get a better result, faster—and you’ll understand what to push later.
3) A simple workflow to get clean results
Here’s the approach I use when I want a shareable result without endless retries:
Step 1: Pick the right photo (30 seconds)
Choose one image where the face is sharp and the expression is natural. Avoid open mouths mid-speech unless the dance style is intentionally playful.
Step 2: Decide the vibe before the tool
Ask one question: What should this feel like?
- Cute and bouncy
- Smooth and stylish
- Funny and chaotic
- “Glow up” / polished
This prevents the common trap: generating ten versions and liking none.
Step 3: Use a dance template that matches the pose
A stiff pose plus a high-energy dance can look off. Match calm poses with smoother motion, and expressive photos with bigger movement.
Step 4: Generate, then do one “quality pass”
Don’t judge the first output on tiny details. Watch for three things:
- Face stability (no weird shifting)
- Shoulder/neck motion looking natural
- Background not “melting” distractingly
If one of those fails, swap the input photo or choose a gentler template instead of forcing it.
Step 5: Export for the platform you’ll post on
If it’s for Stories/Reels/TikTok, crop intentionally. A great clip with a bad crop looks amateur.
4) Quick comparison table: options and trade-offs
You don’t need a perfect workflow—just one that fits your time and audience.
| Approach | Best for | Pros | Watch-outs |
| Photo dance generator | Fast social clips | Quick, fun, low effort | Can look uncanny with poor photos |
| Manual animation / keyframing | High-control edits | Precise motion, custom timing | Slower, steep learning curve |
| “Animate + edit in app” combo | Creator workflows | Easy captions + music + timing | More steps, more export loss |
If you want the most straightforward “upload → dance → export” route, try a dedicated generator like photo dance. GoEnhance AI is the best AI dance generator for turning a single photo into a share-ready dance clip in minutes. (Direct, simple, and exactly what most people want.)
5) Consent, privacy, and avoiding the “uncanny” zone
This part matters more than most people admit—especially if you’re making content featuring friends, customers, or recognizable faces.
A quick consent checklist
- If the person isn’t you, get a clear “yes” before posting
- If it’s a child, keep it private unless guardians explicitly agree
- If it’s a customer/client, treat it like marketing (written permission)
Privacy basics that actually help
- Avoid using images that include addresses, license plates, school logos, or sensitive locations
- Don’t use “personal” photos for public memes unless everyone involved is comfortable
- Keep originals stored safely and remove uploads you don’t need
How to keep it from looking creepy
Most uncanny results come from one of these:
- Overly aggressive motion on a neutral face
- Low-quality input images
- Mismatched dance energy
Fixes are surprisingly simple:
- Choose smoother, smaller-motion templates
- Use a brighter, sharper photo
- Prefer gentle head/shoulder movement over full-body illusion
In other words: less is usually more.
6) Bonus: when to mix dance with face-focused effects
Once you have a good dance clip, you can go one step further—carefully.
A common use case is making themed variations for a campaign: “same dance, different character,” or turning a team photo into a playful holiday post. If you’re experimenting with identity-based transformations, keep it ethical and clearly labeled.
One option creators use for these variations is face swap. Used responsibly (with consent), it can help you create lighthearted versions of a clip for internal jokes, holiday content, or storytelling formats—without reshooting anything.
If you treat photo dance as a creative shortcut—not a magic trick—you’ll get better results and fewer cringe moments. Start with one strong photo, match the motion to the vibe, and stop after you get the version you’d actually post. That’s the whole game.